Whole-Home Ventilation CO2 Targets for Sleep
Set clear CO2 targets for sleep with whole-home ventilation
Your goal is simple: wake up feeling better because the air in your bedrooms stays fresh through the night. In practice, that means you need a measurable target for carbon dioxide (CO2) and a ventilation strategy that can reliably hit it while you sleep.
This guide walks you through setting whole-home ventilation CO2 targets for sleep, then tuning your system to maintain them. You’ll use real readings, not guesswork, and you’ll end with a repeatable process you can run seasonally (and after any home changes like new insulation, window replacements, or occupancy changes).
CO2 isn’t a pollutant you “breathe in” the way smoke is. It’s a proxy for how much exhaled air is accumulating. When people are present, CO2 rises as fresh outdoor air gets diluted. By managing CO2, you manage ventilation effectiveness—especially in bedrooms where windows are closed and airflow is reduced.
Gather what you need before you start tuning
Before you adjust dampers, fan speeds, or ventilation schedules, set up measurement and confirm your system type. That prevents you from tuning blindly.
Tools and setup you’ll want
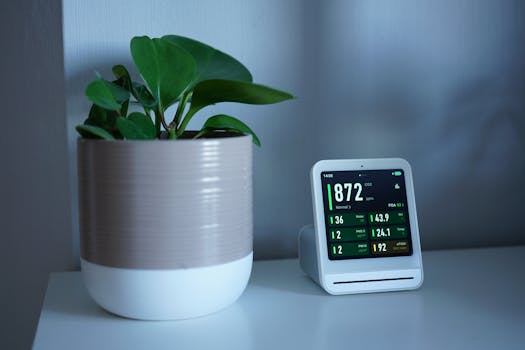
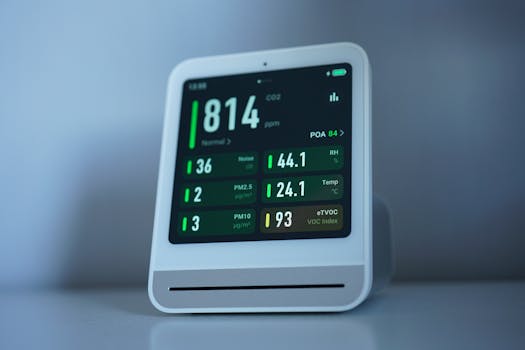
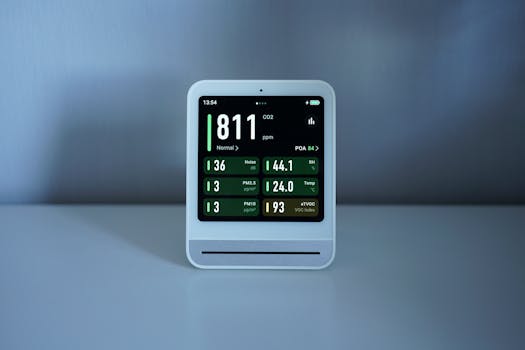
- A CO2 meter with a stable reading and reasonable accuracy. If you’re buying, look for a sensor that reports ppm and supports calibration or proven sensor stability.
- At least one airflow/ventilation measurement aid if you can access it. This can be as simple as checking airflow readings on a controller or using a flow hood for specific vents (optional, but helpful).
- Your ventilation system documentation (manual, app settings, installer notes). You need to know what modes exist (continuous, demand-controlled, boost, purge, etc.).
- Thermometer/humidity awareness (many CO2 meters include temperature and sometimes humidity). Humidity affects comfort and can affect how you set ventilation rates.
- A notebook or spreadsheet for recording baseline CO2 and the time of day. Keep it simple: date, bedroom CO2, outdoor CO2 (if available), HVAC mode, and any changes you made.
Decide where you’ll measure
Measure in the bedroom you care about most. Place the CO2 sensor at breathing height—roughly where your head would be when you’re lying down—typically 3 to 5 feet (1 to 1.5 meters) above the floor. Avoid direct drafts from supply vents, return grills, or exterior doors.
If you have multiple sleeping zones (for example, a guest room and primary suite), pick one zone for the initial tuning. You can repeat the process later for the second zone once your system behavior is understood.
Baseline conditions you should confirm
CO2 targets depend on your ventilation strategy and whether you’re using demand-controlled ventilation (DCV). Before you set targets, confirm:
- Outdoor CO2 baseline (if you can measure it). In most residential areas, outdoor CO2 is typically ~400–450 ppm, but it can vary.
- How the system controls ventilation: fixed-speed/constant flow, periodic cycles, or CO2-driven control.
- Whether your home has any strong air pathways (bathroom exhaust, kitchen hood, fireplace, or make-up air). These can change how quickly CO2 rises and falls.
Choose sleep CO2 targets that match your ventilation control style
Now you set the targets. You’re choosing numbers that are achievable for your system and meaningful for comfort. Start with one target and one “alarm” threshold, then tune toward them.
Use a practical target range for occupied sleep
For most homes aiming for good sleep air quality, a common approach is to keep bedroom CO2 in the range of:
- Primary target: ~800 to 900 ppm during sleep
- Upper comfort limit: ~1000 ppm (try not to stay above this for long periods)
These numbers are practical because they’re low enough to indicate adequate dilution, but high enough that many homes can reach them without running fans at maximum all night.
Adjust targets if your system is DCV or multi-zone
If your whole-home ventilation system is demand-controlled (CO2 sensor input), you’ll typically set a “setpoint” and sometimes a “maximum” or “boost” limit. For DCV setups, consider:
- Setpoint (what the controller tries to maintain): 850 to 900 ppm in the occupied zone
- Boost threshold (what triggers higher ventilation): 950 to 1050 ppm
If your system is not CO2-controlled and instead runs on schedules or continuous low flow, you’ll tune fan speed and run-time to keep the bedroom CO2 below your upper limit for the full sleep window.
Account for outdoor CO2 and your home’s tightness
In tighter homes (or homes with more occupant density), CO2 can climb faster during closed-door sleep. In leaky homes, CO2 can stay lower because infiltration provides some dilution. Either way, your measurement will confirm whether your chosen target is realistic.
Measure your current sleep CO2 baseline before changing anything
You can’t tune what you don’t measure. Spend one night (or two) collecting baseline data so you can make targeted adjustments.
Required setup for baseline night
- Place the CO2 meter in the bedroom at breathing height.
- Ensure the sensor is running at least 30 minutes before you start your sleep period.
- Record whether bedroom doors are open or closed, and note any unusual events (guests, cooking, bathroom exhaust, window opening).
Step-by-step baseline measurement
- Pick your “sleep window”. For example: 11:00 PM to 7:00 AM.
- Start the CO2 meter at least 30 minutes before 11:00 PM (or before you go to bed).
- Note your ventilation mode exactly as it runs today (continuous low, timed cycles, or any existing CO2 setpoint).
- Record CO2 readings. If your meter logs over time, use that. If it doesn’t, take readings at least every 60 minutes and once near the peak (often 2–4 AM).
- Also capture the peak. Write down the highest CO2 value you see during the sleep window.
- Repeat the night if your first night is unusual. Two nights is better than one, especially if weather changes or occupancy differs.
Adjust ventilation settings to reach your sleep CO2 target
Once you have baseline numbers, you can tune your system. The right adjustment depends on whether your ventilation system is DCV, scheduled, or constant.
Step-by-step tuning for DCV (CO2-controlled ventilation)
- Set your controller setpoint to 850–900 ppm for the occupied bedroom zone. If the system uses an average across sensors, choose a value that still keeps your bedroom from exceeding your upper limit.
- Set your boost threshold to 950–1050 ppm. This should be high enough to avoid constant full-speed operation, but low enough to prevent long periods above 1000 ppm.
- Confirm sensor placement. If the system’s CO2 sensor is in a hall instead of the bedroom, you may need to validate that bedroom CO2 still behaves as expected. A hall sensor can lag behind the bedroom, especially with closed doors.
- Run a test night with the bedroom door closed (the usual scenario for sleep). Compare the bedroom CO2 peak and duration above 1000 ppm (if any).
- Fine-tune in small increments. If the bedroom peaks at 1100 ppm, lower the setpoint by 25–50 ppm or lower the boost threshold by 25–50 ppm. If the bedroom stays under 750 ppm, you can raise the setpoint slightly or reduce boost aggressiveness.
- Record results. Use your notes to decide whether the changes moved the peak and how quickly CO2 rises after lights out.
Step-by-step tuning for scheduled or constant ventilation
If your system doesn’t respond to CO2, you’ll tune fan speed and schedule so the bedroom CO2 stays within your target for the entire sleep period.
- Choose a baseline ventilation schedule that matches how you currently run the system (for example, continuous low or cycles every hour).
- Set a target to achieve: keep bedroom CO2 below 1000 ppm and aim for 800–900 ppm during the middle of the night.
- Increase ventilation rate for the sleep window if your baseline peaks above 1000 ppm. Start with a modest change: raise the fan speed one notch or extend the run-time by 30 to 60 minutes within the sleep window.
- Test with bedroom door closed. Keep conditions consistent. If you open the door, CO2 dynamics change and you’ll misread the effect.
- Re-measure the peak. If the peak is still high, repeat the adjustment. If the peak is far below target and you’re hearing/feeling airflow noise, reduce the change slightly.
- Watch humidity and comfort. More ventilation can lower humidity in some climates. If humidity drops too far, you may need to balance ventilation with humidification strategies rather than purely chasing CO2.
Step-by-step tuning for multi-zone homes
Many whole-home ventilation systems distribute air through multiple ducts or zones. You’ll want sleep zones to get enough fresh air without over-conditioning other areas.
- Identify which zone feeds the bedroom. Find the supply and return paths for that room.
- Prioritize the bedroom zone during sleep. If your system supports zone-level controls or damper settings, adjust them so the bedroom zone receives the ventilation rate needed to keep CO2 in range.
- Keep the rest of the house stable while you test. If you change multiple zones at once, you won’t know what caused the CO2 change.
- Confirm pressure balance. If you increase ventilation aggressively in one zone, ensure you’re not creating uncomfortable drafts or negative pressure that pulls air from unwanted sources.
Common mistakes that prevent you from hitting sleep CO2 targets
Most CO2 “failures” aren’t about the target. They’re about measurement errors, control logic, or ventilation pathways you didn’t account for.
Measurement and placement issues
- Sensor placed too close to a vent or window. Direct airflow can artificially lower readings.
- Sensor placed in a hallway instead of the bedroom. A hall sensor can miss bedroom-specific buildup, especially with the bedroom door closed.
- Not enough warm-up time. If you start reading immediately, the sensor may drift before stabilizing.
- Changing behavior during the test. Opening windows, using the kitchen hood at different times, or leaving doors open will change CO2 dynamics.
System tuning and control mistakes
- Setting the CO2 boost too low. If you trigger full ventilation at 850 ppm, the system may run at high speed all night, increasing noise and sometimes drying the air.
- Setting the setpoint too high. If your setpoint is 1100 ppm, you may “technically succeed” in reaching a number, but your sleep air may feel stale and your peak can linger too long.
- Ignoring filters and maintenance. If your ventilation system struggles to move air, CO2 may rise despite correct settings.
- Assuming the system “knows” bedroom occupancy. DCV works only as well as sensor placement and control logic. If the controller sensor is far from the bedroom, it may under-ventilate during sleep.
- Adjusting dampers without verifying airflow. Closing dampers can redirect flow unexpectedly. If you change duct balancing, confirm the system still delivers adequate total airflow.
Practical tips to optimize sleep CO2 performance long-term
After you hit your target once, the job isn’t over. Seasonal weather, filter loading, and changes in household routines can shift CO2 behavior. These tips help you keep your sleep air stable without constant re-tuning.
Use a repeatable “season check” schedule
Run a quick measurement cycle at least twice per year, such as:
- In mid-winter when homes are closed up and stack effect is strong
- In early fall or late spring when outdoor conditions change
Even one night per season can catch drift. If you notice peaks above 1000 ppm, adjust your setpoint or boost threshold in small steps.
Make sure ventilation matches your actual sleep routine
CO2 rises fastest after you go to bed. If your home uses a schedule that increases ventilation only after midnight, you might still overshoot in the early hours. Consider aligning your higher ventilation period with when people are actually in the bedroom.
Example: If you usually go to bed at 10:30 PM, but the schedule boosts air at 12:00 AM, you’ll likely see a higher peak around 1–3 AM. Move the boost earlier by 60–90 minutes, or use DCV so the system responds to rising CO2.
Balance CO2 control with noise and comfort
Ventilation that maintains CO2 targets should also be livable. If you’re hearing fan noise at high speed, you may need to:
- Raise the target slightly within your comfort range (for example from 850 to 875 ppm)
- Increase the “baseline” ventilation a bit and reduce how often you hit full boost
This keeps CO2 controlled without constant high-speed operation.
Plan for filter loading and maintenance
Over time, filters load and airflow can drop. That can cause CO2 to rise even if your settings remain unchanged. Stick to manufacturer maintenance intervals and record filter changes. After a filter change, it’s smart to watch one night’s peak to confirm your system still behaves as expected.
Practical scenario: adjusting targets in a bedroom with a closed door
Here’s a common real-world situation. You have a whole-home ventilation system with a CO2 sensor located in the hallway. Your bedroom door stays closed overnight. After baseline testing, you find the bedroom peaks at 1120 ppm around 3:00 AM, even though the hallway sensor stays closer to 950 ppm.
To fix it, you do the following:
- Set the controller setpoint to 875 ppm and the boost threshold to 1000 ppm.
- Run a test night with the bedroom door closed.
- If the peak is still above 1000 ppm, lower the setpoint by another 25 ppm (to ~850 ppm) or lower the boost threshold to 975 ppm.
- Optionally, if your system allows it, add or relocate a sensor so the controller better represents the bedroom zone.
After tuning, your bedroom peak drops to 980 ppm and stays near your target for most of the night. The key was not just the numbers—it was aligning sensor feedback with the room where CO2 accumulates.
Soft product integration: choose sensing that supports your tuning workflow
If you’re using a standalone CO2 meter to measure bedrooms, pick one that helps you act. Look for features like stable ppm readings, logging, and reliable calibration guidance. Many people pair a high-quality portable CO2 meter with their ventilation system’s controller/app so they can verify performance in the exact sleeping zone.
If you already have a CO2-enabled controller, take advantage of its app settings to adjust setpoints and boost thresholds. When you make changes, keep a log so you can correlate “what you changed” with “what your bedroom CO2 did.” That turns tuning into a controlled process instead of guesswork.
Keep windows strategy consistent during tests
It’s tempting to “help” by cracking a window when CO2 rises. Sometimes that’s fine for short-term relief, but it will interfere with your ability to tune whole-home ventilation. During baseline and tuning nights, keep window behavior consistent—preferably closed—so you can measure the ventilation system’s actual effectiveness.
Don’t chase the lowest possible number
You want fresh air, not constant maximum airflow. Once you’re keeping bedroom CO2 in the ~800–900 ppm range most of the night, you’ll likely get the balance you want between air quality, humidity, and noise. If you push far below that, you may pay for it with higher energy use or discomfort from over-ventilation.
Lock in your sleep CO2 targets with a final verification routine
After you tune settings, verify you’re meeting your target in the real conditions you care about. This step prevents you from stopping too early.
Step-by-step verification
- Choose one “normal” night. Use your usual bedtime, bedroom door position, and routine.
- Run the CO2 meter again in the bedroom at breathing height.
- Confirm your peak. You’re aiming for ~800–900 ppm during much of the night and not staying above 1000 ppm for long stretches.
- Check the timing. If CO2 spikes early and then drops, your ventilation may be ramping too late. If it rises steadily, your baseline airflow may be too low.
- Adjust only one variable if you miss your target. For example, change setpoint by 25 ppm; then retest. Avoid changing schedule, dampers, and sensor placement all at once.
- Save your final settings (screenshots or written notes). If you have an installer app, document the exact values so you can restore them later.
When verification looks good, you’ve effectively created a “sleep air quality setpoint” for your home. That’s what makes whole-home ventilation work for real life—not just on paper.
20.03.2026. 05:44