Whole-Home Air Quality Monitoring: Sensor Placement and What Numbers Mean
Why placement and interpretation matter for whole-home air quality
Whole-home air quality monitoring is only as useful as the data it captures. A sensor that’s placed in a poor location—too close to a bathroom exhaust, directly in a cooking plume, or buried behind furniture—can produce numbers that look “alarming” but don’t represent the air you actually breathe. At the same time, even a perfectly placed sensor can be confusing if you don’t know what the displayed metrics mean or how to interpret them in context.
This guide focuses on two practical topics: (1) whole-home air quality monitoring sensors placement, and (2) how to read the numbers you’ll see on common indoor air quality metrics such as PM2.5, CO2, VOCs, temperature, humidity, and carbon monoxide. You’ll also find guidance on troubleshooting odd readings and using trends to make decisions.
Start with the measurement goals: what you’re trying to detect
Before deciding where sensors go, clarify what you want the system to catch. Most monitoring setups aim to detect one or more of the following:
- Outdoor air infiltration (e.g., wildfire smoke, traffic pollution) through PM and sometimes ozone-related metrics.
- Occupant-related emissions (CO2 from breathing, VOCs from cleaning products, adhesives, and off-gassing).
- Combustion and safety hazards (carbon monoxide, sometimes specific combustion byproducts).
- Moisture and comfort drivers (humidity and temperature that correlate with mold risk and dust mite conditions).
- Ventilation performance (how quickly indoor air returns to baseline after cooking, occupancy, or airing out).
Different goals suggest different placement. For example, CO2 is most informative in occupied spaces, while PM2.5 can be useful near entry points where outdoor air enters. Humidity is best measured where people can be affected by damp conditions, not necessarily where the air is most “stagnant.”
Whole-home sensor placement principles that reduce false alarms

Most placement problems come from sensors being exposed to localized sources or blocked airflow. Use these placement principles as a baseline:
- Keep sensors in representative breathing zones. A typical target is about 3–5 feet (1–1.5 meters) above the floor in areas where people spend time. Avoid placing them directly at floor level where dust and resuspended particles dominate.
- Avoid direct plumes. Don’t mount sensors in the path of HVAC supply vents, near range hoods, or where cooking smoke will pass directly over the sensor.
- Don’t place them in corners or behind furniture. Stagnant air pockets can trap pollutants and cause readings to drift upward or respond slowly.
- Separate “source zones” from “breathing zones.” If you monitor a kitchen, consider placing a sensor where it reflects general kitchen air rather than right beside the stove.
- Allow airflow without drafts. Sensors need air mixing, but strong drafts can cause noisy spikes that don’t represent typical room air.
- Use consistent mounting height and orientation. Consistency makes trend comparisons more reliable across rooms and days.
If your system supports multiple sensors, the best results usually come from placing them to represent different microclimates: bedrooms for night-time exposure, living areas for daytime exposure, and transitional spaces for airflow between zones.
Where to place sensors in each home zone
Here are practical placement patterns for common whole-home layouts. The goal is to capture meaningful variation without overfitting to a single nuisance source.
Bedrooms: focus on night-time CO2 and humidity
Bedrooms are where you’ll often see the most sustained CO2 increases due to occupancy during sleep. Place the sensor in the main sleeping area (or near the center of the room) rather than beside a bed where it might be influenced by head-level breathing turbulence. Keep it away from humidifiers, laundry drying racks, and bathroom doorways.
For humidity, avoid placing the sensor directly next to a shower wall, near a humidifier’s output, or in a closet where air exchange is limited. Bedrooms with attached bathrooms deserve attention: if the bathroom exhaust runs frequently, you may see humidity and VOC swings that reflect the bathroom rather than the bedroom’s baseline.
Living rooms and family rooms: capture typical daily exposure
Living spaces reflect a blend of sources: people, cleaning products, candles or incense (if used), and occasional cooking odors migrating from the kitchen. Place the sensor where it’s not directly exposed to HVAC vents or near windows that open frequently. If there’s a fireplace, keep the sensor far enough away that it won’t measure near-field smoke plumes.
In many homes, a living room sensor becomes the “reference” for how the home behaves under normal daily activity.
Kitchens: separate cooking spikes from general kitchen air
Kitchens are challenging because pollutants can be highly localized and short-lived. If you place a sensor too close to the stove, PM2.5 and VOC readings may spike dramatically during cooking and then fall quickly. That can still be useful—if your goal is to evaluate how well the hood and ventilation control cooking emissions—but it won’t represent what people breathe in adjacent rooms.
A practical approach is to place the kitchen sensor in the broader breathing area (often near the seating or dining side), not directly over the cooktop. If you only have one sensor for the kitchen, treat cooking peaks as expected events rather than persistent air quality problems.
Hallways, entryways, and stairwells: track air exchange between zones
Transitional spaces can reveal how well air moves between rooms and whether outdoor air infiltration is affecting the interior. Place sensors in hallways where air circulates but where the sensor isn’t directly in front of a frequently opened exterior door.
If your home uses a return vent in a hallway, avoid placing the sensor directly adjacent to it. You want representative mixing, not a measurement of air being pulled through the system at that exact spot.
Basements and ground floors: watch for moisture-driven issues and infiltration
Basements often show higher humidity and can be influenced by soil moisture, plumbing leaks, or musty odors. Place the sensor in the main occupied area of the basement, not right next to a dehumidifier’s exhaust. If there are fuel-burning appliances in the basement, sensor placement becomes more safety-critical (and you should also follow manufacturer guidance for combustion-related monitoring).
For homes with crawlspaces or garage-adjacent basements, consider that VOCs and PM can be influenced by garage door opening, vehicle exhaust infiltration, and stored chemicals.
Bathrooms and laundry areas: use them carefully to interpret moisture and VOCs
Bathrooms can produce short spikes in humidity and VOCs from cleaning products and personal care products. If your system includes a bathroom sensor, it can help you understand how quickly the room returns to baseline after showers. Place it away from the shower stall and not directly in front of the exhaust fan.
Laundry rooms can be influenced by detergents, dryer venting, and seasonal humidity changes. If you monitor laundry areas, interpret readings alongside your ventilation habits (window use, exhaust fan runtime, and dryer vent condition).
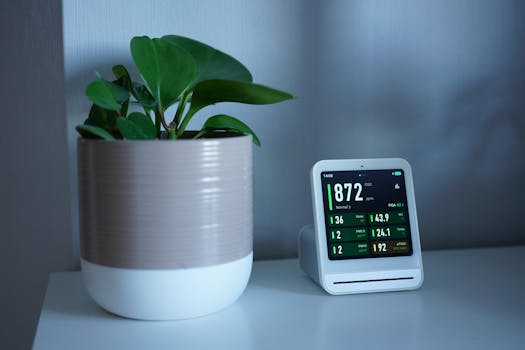
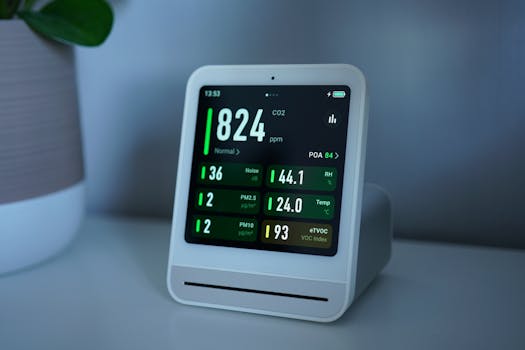
What the numbers mean: PM2.5, PM10, CO2, VOCs, and more
Air quality dashboards often show multiple metrics. Each has a different meaning, different causes, and different “normal” ranges. The most reliable way to interpret readings is to understand what the metric measures and how it typically behaves over time in your specific home.
PM2.5 (fine particulate matter): smoke, dust, and combustion fingerprints
PM2.5 measures fine particles small enough to penetrate deep into the lungs. Indoors, PM2.5 can rise from cooking, candles, fireplaces, smoking/vaping, dust disturbance, and outdoor smoke infiltration.
How to interpret:
- Short spikes often correspond to cooking or localized dust events.
- Gradual rises can indicate outdoor infiltration (wildfire smoke) or ongoing sources.
- Night-time stability in bedrooms can be a good sign that no ongoing particle sources exist.
Many dashboards express PM2.5 in micrograms per cubic meter (µg/m³). Even without memorizing thresholds, the pattern matters: compare the same room at the same time of day on different days and look for step-changes after specific activities.
PM10 (coarser particles): dust and tracked-in debris
PM10 includes larger particles that may be generated by dust, resuspension, and outdoor dirt. PM10 can rise when sweeping, walking in dusty areas, or when outdoor conditions are dusty.
If PM2.5 is low but PM10 is elevated, it may point more toward dust and less toward combustion smoke—though indoor chemistry and ventilation still matter.
CO2 (carbon dioxide): ventilation and occupancy proxy
CO2 is not usually a direct health hazard at typical indoor levels, but it’s a powerful indicator of ventilation adequacy and occupancy load. CO2 rises when people exhale and when fresh air exchange is insufficient.
How to interpret:
- Baseline matters. Many homes settle at a “background” level depending on outdoor CO2 and ventilation. Learn your baseline when the home is unoccupied.
- Occupied-room rises typically reflect breathing load and ventilation rate.
- Fast recovery after opening windows or running HVAC indicates ventilation is effective.
CO2 is often displayed in parts per million (ppm). Rather than focusing on a single number, track how high CO2 goes during typical occupancy and how long it takes to return to baseline after ventilation changes.
VOCs (volatile organic compounds): sources vary widely
VOCs is a broad category. Sensors often report a composite index such as TVOC (total VOC) in parts per billion (ppb) or sometimes a relative scale depending on the device.
How to interpret:
- Sudden increases often correlate with cleaning products, paints, new furniture, air fresheners, or strong cooking odors.
- Slow declines can occur as off-gassing dissipates.
- Room-to-room differences can help locate the source (e.g., bathrooms vs. living areas).
Because VOC sensors can be less specific than PM sensors, treat VOC readings as directional. Pair the data with what’s happening in your home: recent cleaning, renovations, and chemical storage.
Carbon monoxide (CO): safety metric, not a “comfort reading”
Carbon monoxide is a safety-critical gas produced by incomplete combustion. If your monitoring system includes CO, treat it as a serious indicator. CO readings can sometimes be influenced by sensor placement near combustion sources, but they should not be ignored.
How to interpret:
- Look for persistent elevation rather than brief fluctuations.
- Correlate with appliance use (gas stove, furnace cycling, water heater operation).
- Follow local safety guidance and alarm protocols if CO is detected.
Note: Many homes use dedicated CO alarms for safety; air quality monitors can complement them but should not replace code-required safety devices.
Temperature and humidity: comfort, mold risk, and dust behavior
Temperature affects how quickly air mixes and can influence perceived odor and comfort. Humidity strongly affects mold growth potential and dust mite conditions, and it can also change how VOCs and particles behave indoors.
How to interpret humidity:
- Rapid jumps often follow showers, cooking steam, or laundry drying.
- Persistent high humidity suggests inadequate ventilation or a moisture source (leaks, condensation, or insufficient dehumidification).
- Very low humidity can increase dryness-related discomfort and may contribute to dust resuspension.
Rather than chasing a single “perfect” number, focus on whether humidity returns to a stable range after moisture events.
How sensor placement changes what the numbers look like
Two sensors can show different values even in the same room because of micro-environments. Understanding these effects helps you avoid overreacting to misleading data.
Proximity to sources and sinks
Place sensors away from obvious sources (stove, candles, cleaning spray) and away from sinks like bathroom exhaust directly in front of the fan. If a sensor is too close to a source, it may exaggerate peaks; if it’s too close to a sink, it may underreport typical conditions.
Airflow pathways: HVAC supply, return, and mixing
When a sensor sits in the path of HVAC supply air, it may read “outdoor-like” values more quickly than other parts of the room. Conversely, if it’s near a return vent, it may sample air that is being pulled out, potentially smoothing spikes.
For trend monitoring, aim for a location where the sensor experiences representative mixing rather than engineered flow.
Sunlight, exterior exposure, and seasonal drift
Temperature sensors can shift when exposed to direct sunlight. Humidity readings can also drift if the sensor is near exterior walls with thermal bridging or condensation risk. If you’re seeing patterns that correlate with daylight hours, check placement and consider moving the sensor away from direct sun.
Using trends to interpret “normal” vs. “problem” behavior
Absolute thresholds vary by device and by your local climate, but trends are more consistent. A practical approach is to establish “baseline behavior” for each room.
Build a baseline for each room
For one to two weeks, observe typical daily cycles. Ask:
- Does CO2 rise during the day and peak during occupancy?
- Do PM2.5 values spike during cooking or peak during outdoor smoke events?
- Does humidity spike after showers and return to baseline within a reasonable time?
- Are VOC readings connected to cleaning, laundry, or known chemical use?
If your system supports room-by-room history, you can often identify patterns without needing to memorize numeric thresholds.
Watch for persistent deviations, not single events
A single spike can be normal. Persistent elevation—especially in PM2.5, VOCs, or humidity—suggests an ongoing source or ventilation issue. For CO2, persistent high levels across the day may indicate inadequate fresh air exchange or system settings that aren’t meeting real occupancy needs.
Correlate metrics when possible
Some combinations are informative:
- CO2 high + humidity high in a bedroom may mean poor ventilation and moisture accumulation from occupancy.
- PM2.5 spikes + VOC spikes can align with cooking or combustion events.
- VOC elevation without PM can point toward chemical use, off-gassing, or cleaning products rather than smoke.
Even if you don’t know the exact source, correlation helps narrow down likely causes.
Common placement mistakes and how to correct them
Many “bad data” issues are fixable with simple adjustments.
Sensor mounted too close to a window or exterior wall
Direct outdoor influence can make indoor readings swing with outdoor conditions. If you want indoor air quality representative of the room, place the sensor slightly inward from exterior walls and away from direct sun.
Sensor near a bathroom exhaust fan
Readings may drop unrealistically fast or show abrupt oscillations. Move the sensor away from the immediate airflow path while still keeping it within the breathing area of the bathroom or adjacent room.
Sensor placed behind furniture or inside a cabinet
Restricted airflow can cause stale air sampling. Relocate to open air space with normal circulation.
Sensor treated like a “stove monitor” or “kitchen smoke detector”
Kitchen spikes are expected during cooking. If the goal is whole-home comfort and risk monitoring, place the sensor to reflect general kitchen air and interpret cooking-related peaks as activity-driven.
Ignoring height and mixing
If one sensor is placed at 6 inches above the floor while another is at 5 feet, they can report systematically different PM profiles. Standardize mounting height across rooms.
Practical guidance: a placement plan that works for most homes

If you’re designing a whole-home monitoring approach from scratch, a reliable baseline plan is to cover the main breathing zones and the main airflow transitions.
- One sensor in the primary living area to represent daytime exposure.
- One sensor in the main bedroom zone to represent night-time CO2 and humidity behavior.
- One sensor in a transitional space (hallway or near the center of circulation) to reflect mixing between zones.
- Optional sensors for kitchens, basements, or bathrooms if those areas have distinct sources or moisture dynamics.
If your home has multiple floors, consider placing at least one sensor per floor so that air mixing differences across levels don’t go unnoticed.
How monitoring devices typically report values (and why calibration can differ)
Different devices use different sensors and algorithms. For example, PM monitors may use optical methods that respond differently to particle composition, while VOC sensors often rely on metal-oxide or similar approaches that react broadly to many gases. CO2 sensors may be NDIR-based and generally more stable, but placement and ventilation still affect readings.
Practical implication: don’t treat numeric output as universal truth across brands. Instead, treat it as consistent within your system—then use placement and baseline comparisons to interpret what’s happening in your home.
If you have access to device documentation, look for guidance on sensor warm-up time, expected drift, and placement recommendations. Many systems are designed to be placed at typical indoor breathing height with open airflow.
Prevention guidance: use sensor data to reduce exposure and dampen risk
Monitoring is most valuable when it leads to better indoor air control. The goal isn’t to chase perfect numbers; it’s to reduce exposure to harmful spikes and prevent persistent moisture or chemical buildup.
- For PM2.5: reduce particle sources (avoid indoor combustion where possible), improve filtration if your HVAC supports it, and respond to outdoor smoke events by adjusting ventilation strategy.
- For CO2: increase fresh air during occupancy (via HVAC settings, balanced ventilation, or controlled airing out) and verify that CO2 returns to baseline after ventilation changes.
- For VOCs: improve source control (ventilate after cleaning, store chemicals sealed, allow off-gassing time for new materials) and interpret spikes in context.
- For humidity: address moisture sources, ensure bathroom and laundry exhaust are effective, and verify that humidity returns to baseline after wet events.
Finally, remember that some metrics overlap with safety devices. CO monitors in a whole-home system should complement, not replace, code-required alarms for combustion-related hazards.
Summary: placement strategy and interpretation checklist

Whole-home air quality monitoring sensors placement determines whether your readings reflect the air you breathe or a localized micro-environment. Use representative breathing-zone heights, avoid direct plumes from HVAC and cooking, and keep sensors out of corners and behind furniture. Then interpret each metric by its meaning: PM2.5 for fine particles and smoke/dust events, CO2 as a ventilation and occupancy proxy, VOCs as a broad indicator of chemical sources, and humidity as a driver of mold and comfort dynamics.
Most importantly, rely on trends and room-to-room differences. Establish baselines, watch for persistent deviations, and correlate spikes with real activities. With careful placement and grounded interpretation, whole-home monitoring becomes a practical tool for protecting indoor air without guesswork.
01.01.2026. 11:58