Joint Mobility Warm-Up Routine for Better Movement
Goal: wake up your joints for smoother, safer movement

A joint mobility warm-up routine prepares your body for training or physical activity by improving how your joints move through range. The aim isn’t to “stretch hard” or force end ranges—it’s to increase blood flow, lubricate joints through controlled motion, and rehearse movement patterns so you can move with better control.
Use this routine before workouts, sports, long walks, or any session where you want improved range of motion, reduced stiffness, and cleaner mechanics.
Preparation: what you need before you start
Set yourself up so you can move comfortably and safely through full, controlled ranges.
- Time: 10–15 minutes for a full-body warm-up.
- Space: enough room to lunge, hinge, and roll on the floor.
- Clothing: breathable, flexible layers that don’t restrict movement.
- Optional tools: a yoga mat for comfort, a foam roller for gentle tissue prep, and a light resistance band for shoulder and hip drills.
- Breathing: slow nasal breathing or steady exhalations during end-range holds to keep tension under control.
Before you begin, do a quick general warm-up for 1–2 minutes—easy marching, jumping jacks at low intensity, or a brisk walk—so your muscles are ready to move.
Step-by-step joint mobility warm-up routine
Move through the sequence below in order. Each step should feel like “controlled readiness,” not pain. Aim for smooth motion, steady breathing, and gradual increases in range.
1) Ankle joint rocks (knee-to-wall) – 60 seconds per side
Stand facing a wall or sturdy surface. Place the foot about a hand’s width from the wall. Keep your heel down and slowly move your knee forward toward the wall without letting the arch collapse.
- Perform 8–10 slow reps on each side.
- Then pause at the end range for 2–3 seconds and return.
Focus: smooth dorsiflexion (ankle bending) and stable foot contact.
2) Hip flexor and glute activation flow – 6 reps per side
Assume a half-kneeling position. Tuck your pelvis slightly to avoid arching your low back, then gently shift your weight forward until you feel the stretch/activation in the front of the hip.
- Hold 2 seconds while breathing out.
- Return and repeat for 6 controlled reps per side.
Focus: pelvic control and a “lifted” torso.
3) World’s greatest stretch (modified) – 5 reps per side
From a lunge position, place a hand down and rotate the torso slightly toward the front leg. Sweep the other arm overhead and then return to the start.
- Do 5 slow reps per side.
- Move only as far as you can while keeping the pelvis level.
Focus: hip rotation and thoracic mobility without collapsing your lower back.
4) Hip hinge mobility (hands on hips) – 8 reps
Stand with feet hip-width apart. Place hands on your hips. Hinge at the hips by sending your hips back while keeping the spine long. Stop before you lose neutral positioning.
- Perform 8 reps at a controlled pace.
- On the last 2 reps, pause for 2 seconds in the hinge position.
Focus: consistent hip movement pattern and stable torso.
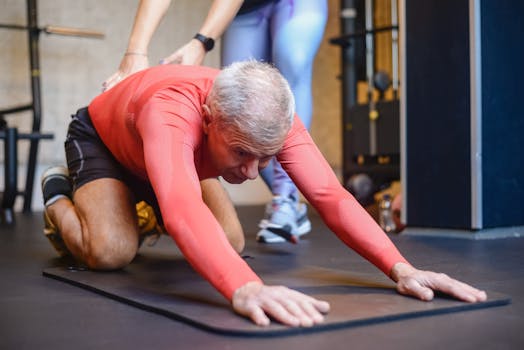
5) Spinal segment rolls (cat-cow, controlled) – 6–8 reps
On hands and knees, move through cat-cow slowly—round the upper back, then return to neutral and arch gently. Keep the motion driven by the spine, not by dropping the head.
- Do 6–8 reps.
- Exhale as you move into each end range.
Focus: segment-by-segment control rather than maximum range.
6) Thoracic rotation on all fours – 5 reps per side
From hands and knees, place one hand behind your head. Rotate your upper back and reach the elbow toward the opposite side, keeping hips fairly still.
- Perform 5 slow reps per side.
- Pause 1–2 seconds at the rotated position.
Focus: rotation through the mid-back, not twisting from the low back.
7) Shoulder CARs (controlled arm circles) – 3 slow circles each direction
Stand tall and move both shoulders through controlled circular motions. Keep elbows slightly bent. Make the circles small at first, then widen only if you can keep the movement smooth.
- Do 3 circles forward and 3 backward.
- Keep the neck relaxed.
Focus: smooth scapular and shoulder motion without shrugging.
8) Scapular wall slides or band pull-aparts – 8–10 reps
Choose one option based on comfort:
- Wall slides: back against a wall, elbows bent. Slide arms upward while keeping ribs down and shoulders controlled.
- Band pull-aparts: hold a light resistance band at chest height and pull outward while squeezing shoulder blades gently.
- Complete 8–10 reps.
- Stop before form breaks.
Focus: shoulder blade control and stable upper back.
9) Hip and knee mobility squat rocks – 8 reps
Stand in a comfortable squat depth. Rock forward and back slightly without bouncing. Keep your feet flat and knees tracking in line with your toes.
- Do 8 slow rocks.
- For the last 2 reps, hold the forward position for 2 seconds.
Focus: ankle-to-hip coordination and controlled knee tracking.
10) Single-leg balance with controlled reach – 20–30 seconds per side
Stand on one leg. Reach forward or to the side with the opposite hand while keeping your torso upright. If needed, lightly touch a wall for stability.
- Hold 20–30 seconds and repeat on the other side.
- Maintain steady breathing.
Focus: joint stability under controlled mobility.
Common mistakes that reduce effectiveness (and how to fix them)
- Going too fast: If reps feel sloppy, slow down. Mobility improves when you can control the end range.
- Forcing pain: Mild discomfort can be normal, but sharp pain or joint pinching is a stop signal. Reduce range and keep movement smooth.
- Using momentum: Avoid bouncing in squats or lunges. Momentum turns mobility into uncontrolled movement.
- Letting the low back take over: During rotations, keep hips stable and think “rotate from the upper back.”
- Over-stretching before warming: The goal is mobility and readiness, not long passive stretching. Use short holds and controlled reps.
- Ignoring the feet and ankles: If your ankles are stiff, hips and knees compensate. Spend extra time on ankle rocks and squat rocks.
Additional practical tips to optimize your mobility warm-up
- Match the routine to the session: If you’re doing a lower-body workout, repeat Steps 1, 3, 4, and 9 with slightly longer holds. If you’re training upper body, add an extra round of Steps 6–8.
- Use a “ramp” approach: Start with small ranges and gradually add a little motion each set. This keeps joints comfortable and improves control.
- Choose the right intensity: You should finish feeling more mobile and ready, not exhausted. If you feel fatigued, reduce reps or shorten holds.
- Keep breathing consistent: Exhale during end-range positions. It helps reduce protective muscle guarding and supports smoother motion.
- Track one or two key joints: For example, note whether your knee-to-wall improves or whether your thoracic rotation feels freer. Small changes over time confirm you’re benefiting.
- Use simple tools when helpful: A foam roller can be used briefly (30–45 seconds) for general tissue comfort before mobility work, but avoid turning it into aggressive “prehab pain.” A light resistance band is useful for shoulder control drills when you don’t have wall-slide access.
- Adapt for limited mobility: If ankle rocks are restricted, shorten the range and focus on heel-down control. If thoracic rotation is limited, reduce the arm reach and increase only when the low back stays quiet.
How to progress this routine over time

Progress doesn’t require more intensity; it requires more quality. After 2–4 weeks of consistent use, you can increase the challenge slightly by adding one of the following:
- Add 1–2 reps to two or three of the steps.
- Add a 2–3 second end-range hold to ankle rocks, thoracic rotation, or hinge mobility.
- Slow the tempo (aim for 3–4 seconds into the end range, 2 seconds back).
- Reduce assistance during balance (less wall contact) while maintaining control.
Stop progressing if you notice joint irritation that lasts into the next day. In that case, return to the previous range and reduce holds for a week.
When done consistently, a joint mobility warm-up routine becomes a reliable “movement reset.” Your joints should feel easier to control, your positions should hold better under load, and your training should feel more efficient from the first set.
12.02.2026. 04:39