How to Measure VO2max with Wearable Accuracy (Step-by-Step)
Goal: get a reliable VO2max estimate from your wearable
VO2max is a measure of how much oxygen your body can use during intense exercise. Wearables estimate VO2max using a mix of heart-rate data, activity metrics, and—on some devices—respiratory or motion signals. The catch is that these estimates can be surprisingly sensitive to setup, sensor quality, training state, and the type of workout used. This guide focuses on practical steps you can take to improve the accuracy and repeatability of VO2max values from wearables.
By the end, you’ll know how to prepare your device and body, run the right test sessions, validate that your heart-rate data is trustworthy, and interpret the results in a way that reflects real physiological change rather than measurement noise.
Preparation: what you need before you run a VO2max test
Before you start, treat VO2max estimation like a measurement process rather than a button you press. The goal is consistent data quality and consistent test conditions.
1) Choose the right wearable setup
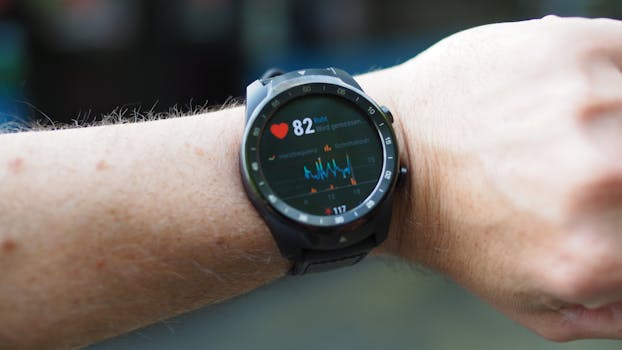
Most VO2max estimates depend heavily on accurate heart-rate readings. If you have options, select the configuration that gives you the most stable heart-rate signal during hard efforts.
- Optical wrist HR: convenient, but can drift during high cadence, heavy sweating, or arm motion that causes poor skin contact.
- Chest strap HR: often more stable for high-intensity work. If your wearable ecosystem supports it, it can materially improve data quality.
- Multiple-device consistency: if you use more than one wearable, you’ll likely see different VO2max values. Pick one system for tracking trends.
Common examples of wearable ecosystems that provide VO2max estimates include Garmin’s VO2max functionality, Fitbit’s cardiorespiratory fitness estimate, Apple Watch’s VO2max estimate (where available), and Whoop’s fitness metrics. The exact method varies by brand, but the measurement principles—especially good heart-rate data—stay consistent.
2) Ensure firmware and sensors are ready
- Update your wearable firmware and the companion app.
- Confirm your HR sensor is clean and seated correctly (for wrist: snug but not painfully tight; for strap: proper placement and wet/gel contact if recommended).
- Verify GPS acquisition if your model uses pace/velocity for estimation. Perform a quick GPS lock check outdoors.
- Set your personal profile accurately (age, sex, height, weight). Even small errors can affect VO2max calculations.
3) Prepare for a consistent testing environment
VO2max estimation improves when conditions are consistent. Choose a route or setup you can repeat.
- Prefer outdoor running/walking on a track or a route with minimal stops.
- Keep weather reasonable (extreme cold can affect sensor performance and heart-rate behavior).
- Use similar clothing and hydration habits across test attempts.
Step-by-step: how to measure VO2max with wearable accuracy

Follow these steps in order. The focus is to reduce measurement error before you run any test, and to use workouts that match how your wearable generates VO2max estimates.
Step 1: Confirm your heart-rate signal quality before you chase VO2max
Start with a short warm-up and observe whether your heart rate behaves plausibly.
- During warm-up (easy jog or brisk walk), heart rate should rise gradually with effort.
- During steady segments, it should remain relatively stable (not constantly jumping or dropping).
- During hard segments, it should rise quickly and then plateau or vary smoothly rather than oscillating wildly.
If you see obvious dropouts, delayed response, or erratic spikes, fix the sensor contact first. If you’re using a wrist sensor, try tightening slightly, repositioning on the forearm, or switching to a chest strap if your setup allows. Accurate VO2max depends on accurate HR.
Step 2: Pick a workout type that your wearable can use effectively
Wearables typically estimate VO2max from a combination of:
- High-intensity efforts (often intervals)
- Steady-state aerobic work
- Heart-rate dynamics and recovery patterns
- Motion and pace (running/cycling) or time-in-zone (in some models)
To maximize accuracy, choose the workout style your device is designed to interpret for VO2max. In practice, that usually means one of the following:
- Interval sessions with clear hard/easy transitions
- Tempo or threshold-like efforts where HR is elevated and stable
- Repeated steady efforts with minimal interruptions
For example, if your wearable’s VO2max estimate improves after “run” workouts with GPS and HR, then ensure your VO2max-related sessions are recorded with the correct activity type and without frequent GPS dropouts.
Step 3: Use a repeatable protocol for multiple attempts
Accuracy is not just about one test; it’s about repeatability. Run the same style of session at least 2–3 times across the first couple of weeks, then compare the variability.
A practical approach is to run a consistent “VO2max-supporting” session once per week for several weeks. Keep the warm-up duration and interval structure consistent. For instance:
- Warm-up: 10–15 minutes easy
- Build: 3–5 minutes of gradually increasing intensity
- Intervals: 4–6 repetitions of hard work with controlled recovery
- Cool-down: 10 minutes easy
Hard work should be challenging enough to elevate HR near your upper ranges, but not so chaotic that HR tracking becomes unreliable. Your goal is measurable, repeatable effort—not all-out sprinting every rep.
Step 4: Calibrate your wearable for heart-rate and motion (when supported)
Some devices offer calibration steps or settings that can reduce error. While exact steps vary, the underlying principle is consistent: improve HR accuracy and ensure your device knows your sensor and motion patterns.
- Heart-rate calibration: if your device supports HR calibration, complete it according to the app instructions.
- Running/cycling settings: ensure the correct activity profile is selected (running vs treadmill vs cycling).
- Treadmill mode: if you use treadmill workouts, verify whether your device uses treadmill pace/steps differently; treadmill VO2max estimates can be less consistent if GPS is absent.
If your wearable uses GPS pace for VO2max estimation, confirm GPS lock before starting. Poor GPS can distort pace metrics, which some models use as inputs.
Step 5: Capture the full session data correctly
After preparation, the measurement quality depends on how you record the workout.
- Start the correct activity type (e.g., “Run,” “Interval Run,” or the closest match).
- Keep pauses minimal. If your workout includes stops, note them and keep them consistent across attempts.
- Ensure HR is recording continuously (watch for “no signal” icons or missing segments).
- Use consistent intensity cues. If you’re doing interval work, follow the same duration and recovery structure each time.
For best results, avoid switching activity modes midway through a session. VO2max estimates can be sensitive to how the device segments your workout.
Step 6: Check the wearable’s VO2max estimate output timing
Many wearables do not compute VO2max instantly at the end of a workout. Some update after a sync, others after a few hours or after multiple sessions. To avoid confusion:
- Sync immediately after the session.
- Record the VO2max value and the date/time it updates.
- Don’t compare a value from one day to another value that was computed using different workout inputs.
Also note whether the value is an estimate based on a running model, cycling model, or general cardiorespiratory fitness model. Tracking the same activity type improves comparability.
Step 7: Validate your data quality using heart-rate behavior and recovery
You can’t directly “see” VO2max math inside most consumer wearables, but you can evaluate whether the underlying inputs are physiologically reasonable.
After the session, review:
- Heart-rate curve: does it rise with effort and recover during easy segments?
- Stability during intervals: HR should not repeatedly drop to near-warm-up levels while you’re still working.
- Post-exercise recovery: HR should gradually decline in cool-down and after the session ends.
If heart rate looks implausible, assume the VO2max number may be biased. In that case, repeat after improving sensor fit or switching to a chest strap.
Step 8: Track trends instead of chasing day-to-day changes
Even under ideal conditions, VO2max estimates from wearables will vary due to sleep, stress, hydration, and how well the measurement model matches your workout. The most useful approach is to track the trend over several weeks.
- Use a consistent workout frequency (e.g., one VO2max-supporting session per week).
- Maintain consistent HR sensor setup.
- Compare averages across multiple weeks rather than single-day spikes.
If you see a large shift after one session, treat it as a signal to check data quality first. Large improvements should be plausible given your training load and recovery, but measurement error can mimic improvement.
Step 9: Use a reference test when you truly need higher confidence
If your priority is “wearable accuracy” in the strictest sense, you need a reference. The gold standard is lab-based measurement of VO2max (typically during graded exercise with breath-by-breath gas analysis). If a lab test is available, do it once as a baseline.
Then use wearables to monitor changes between lab checks. Even if wearable VO2max values don’t match lab numbers exactly, consistency relative to your own baseline can still be valuable.
If you can’t access lab testing, you can still improve confidence by using repeatable field protocols and comparing your wearable VO2max estimates against other performance markers (like repeatable interval times and HR recovery). The key is consistency, not perfection.
Common mistakes that reduce VO2max estimate accuracy
Most “inaccurate VO2max” reports come from predictable issues. Avoiding these problems can improve your results more than any single workout tweak.
1) Wearing the sensor too loosely or inconsistently
Wrist sensors are sensitive to contact pressure and placement. If you wear the watch higher on one day and lower on another, or if the fit changes as your wrist warms up, heart-rate tracking can drift. Drift leads to wrong VO2max inputs.
2) Using the wrong activity type
If you record an interval workout under a mode that doesn’t use the same inputs (e.g., treadmill vs outdoor run), your wearable may apply a different estimation model. This can shift VO2max values even if your physiology is unchanged.
3) Doing maximal sprint efforts that break the measurement model
All-out sprinting can cause heart-rate lag, motion artifacts, and inconsistent HR plateaus. Interval work should be intense but controlled enough for stable HR readings and repeatable pacing.
4) Skipping warm-up or rushing into high intensity
VO2max-related estimation relies on heart-rate dynamics and the relationship between effort and HR. If you start hard immediately, HR may lag and the model may misinterpret the early phase of the workout.
5) Poor GPS or frequent signal loss
If your wearable uses pace or speed inputs, GPS instability can distort those metrics. This can affect VO2max estimates, especially on devices that blend HR with movement data.
6) Comparing values across different sensor setups
Switching from wrist HR to chest strap, or changing which device you use, can change the VO2max number. If you want accuracy for tracking, keep the measurement setup consistent.
Additional practical tips to optimize wearable VO2max measurement
Once you have the basics working, these refinements can tighten the reliability of your VO2max estimates.
1) Choose one reliable HR measurement method
If your wearable supports a chest strap and you’re serious about VO2max measurement, use it consistently for the sessions that feed your VO2max estimate. If you prefer wrist HR, improve contact quality and avoid workouts that cause excessive wrist movement artifacts.
Even within the same category, different strap brands and fit techniques can change performance. The goal is not “perfect HR,” but stable HR across reps and sessions.
2) Keep interval structure consistent across weeks
VO2max models often respond to patterns: how fast HR rises, how high it gets, and how recovery behaves. If one week you do 4×4 minutes and the next week you do 8×2 minutes with the same total work, the wearable may respond differently because the HR dynamics differ.
Consistency helps you interpret changes as training effects rather than protocol differences.
3) Use similar warm-up and cool-down durations
Warm-up affects HR baseline and the speed of HR response. Cool-down affects recovery behavior and can influence how the wearable segments your workout. Keep these phases stable.
4) Watch for sensor drift caused by sweat, movement, or skin contact
For wrist sensors, sweat can both help (better contact) and hurt (slippage). If your readings degrade mid-workout, adjust fit or try a different placement. For straps, ensure it stays in the correct position throughout the session.
5) Manage training load and recovery before testing
If you test while overly fatigued, your heart rate may run higher for a given pace, and interval performance may drop. That doesn’t mean your VO2max decreased; it may mean your current state made the workout harder than usual. Track VO2max trends but interpret them alongside how you feel and how you perform.
6) Record and review your session notes
A simple log helps you identify patterns that affect accuracy. For each VO2max-supporting session, note:
- Sleep quality and stress level
- Weather and temperature
- Any sensor issues (HR dropouts, GPS loss)
- Your interval performance (even basic metrics like total work time)
Over time, you’ll learn which conditions make your wearable estimates more stable.
7) Treat VO2max estimates as “cardiorespiratory fitness signals”
Even with careful measurement, consumer wearable VO2max is an estimate. The most actionable use is to monitor how your cardiorespiratory fitness signal changes over time relative to your training. When the signal improves consistently while your workouts become more repeatable, it’s likely reflecting real physiological adaptation.
8) If accuracy is critical, standardize the entire workflow
To get the closest possible wearable accuracy, standardize everything you can:
- Same wearable and same sensor method
- Same activity type and workout protocol
- Same time of day when feasible
- Same warm-up and cool-down structure
- Same syncing and review process
This reduces measurement noise and makes the wearable’s estimate more meaningful.
Practical example: a repeatable weekly protocol that improves VO2max estimate stability
Here’s a concrete workflow you can apply to running. Adjust intensity to your fitness level so efforts are hard but controlled.
- Two days before: do an easy run or rest. Avoid a hard session right before your VO2max-supporting workout.
- Day of test: ensure the wearable is updated, HR sensor is clean, and GPS locks before you start.
- Warm-up: 12 minutes easy, then 4 minutes building intensity gradually.
- Intervals: 5×3 minutes hard with 2 minutes easy between. Keep recovery consistent and don’t stop moving completely.
- Cool-down: 10 minutes easy.
- After: sync immediately and note the VO2max estimate update time.
- Review: check that heart rate rose smoothly during hard reps and recovered during easy segments without obvious dropouts.
- Repeat next week: keep the same structure and compare the trend over 4–6 weeks.
If the VO2max estimate fluctuates widely between weeks, inspect the HR quality first. Often the “fix” is sensor contact or protocol consistency rather than changing training drastically.
Practical example: improving wrist-HR accuracy for high-intensity intervals
If you use a wrist sensor and notice HR instability during intervals, try this workflow:
- Place the watch slightly higher on the forearm (still within your device’s recommended range) and ensure snug contact.
- Check skin contact after the first 5 minutes of warm-up; re-tighten if it loosens as you move.
- Use a shorter first interval (or a “practice rep”) to confirm HR tracking before committing to the full session.
- If HR still drops or spikes, switch the session to a chest strap if available, and keep the rest of the workout protocol identical.
This approach helps you isolate the measurement problem. Once HR quality is stable, VO2max estimates become more consistent and more useful for tracking changes.
How to interpret wearable VO2max numbers responsibly
To use wearable VO2max accurately, interpret it in context:
- Look for trend consistency rather than day-to-day changes.
- Confirm that the workouts driving updates match the wearable’s estimation model (often intervals or hard aerobic work).
- Compare results only when your sensor setup and activity type are the same.
- If you have a lab baseline, treat the wearable as a monitoring tool that reflects relative changes rather than exact replication of lab values.
When you apply consistent measurement practices, VO2max estimates can become a reliable indicator of how your aerobic fitness is progressing.
Key checklist before you trust a VO2max update
- Your heart-rate signal was stable during hard segments.
- The workout was recorded under the correct activity type for VO2max estimation.
- You had a proper warm-up and controlled interval structure.
- GPS and pace inputs (if used) were stable.
- You used the same wearable and sensor method as previous sessions.
- You compared trends over weeks, not single updates.
Following this checklist won’t guarantee lab-grade accuracy, but it will significantly improve wearable VO2max reliability and help you distinguish true fitness change from measurement noise.
07.04.2026. 23:19