HRV Flatline After New Wearable Sensor Fit: Troubleshooting Data Drift
What “HRV flatline” looks like after you fit a new wearable sensor
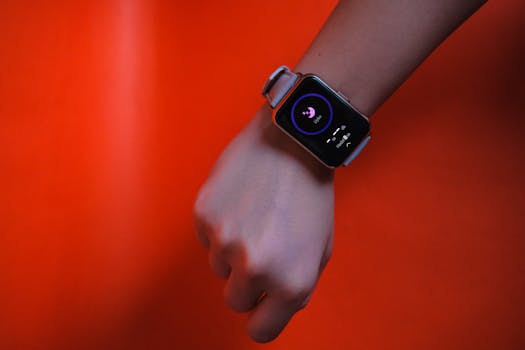
When you put on a new wearable sensor (or you refit an existing one), the first day can be misleading. The most common complaint is a HRV flatline—your heart-rate variability readings suddenly stop changing, or they stay pinned to a narrow band for hours. Sometimes your HRV looks “stuck” while your heart rate still moves normally.
You might notice one or more of these signs:
- HRV stays nearly constant (for example, within ±2–5 ms) even during rest, sleep, or low-activity periods.
- HRV drops to zero-like values or flips between a couple of numbers with no daily pattern.
- HRV becomes delayed (it only updates after a long time) or updates only when you move.
- SpO2/skin temperature/optical signal looks “normal,” but HRV is the only metric that behaves wrong.
- After you re-wear the device, the graph looks smooth for heart rate but HRV looks like a flat line.
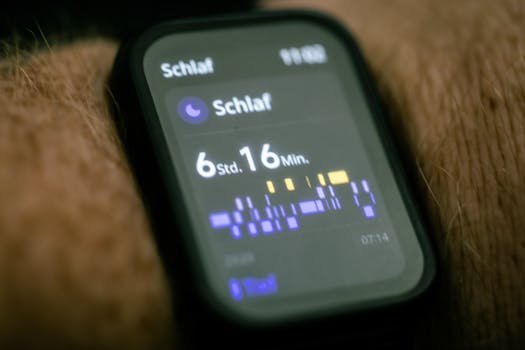
A real-world scenario: you replace a strap or swap to a new sensor module, then you do a normal evening routine—shower, dinner, then lying down. Your wearable shows a steady heart rate, but HRV remains flat from 9:30 pm to 1:00 am. The next morning, HRV still doesn’t recover. That pattern usually points to signal quality and calibration issues rather than a sudden physiological problem.
Most likely causes of HRV flatline after a sensor fit or data drift
HRV is computed from the timing between heartbeats (often called inter-beat intervals). Wearables estimate this indirectly using optical sensors and algorithms. That means small changes in fit, contact pressure, motion, or sensor alignment can have an outsized impact on HRV even if your heart rate still looks reasonable.
Here are the most common causes when HRV flatlines after you fit a new wearable troubleshooting sensor:
1) Skin contact isn’t stable enough for accurate beat-to-beat timing
New straps, different sensor modules, or even a slightly different placement can reduce contact quality. HRV is sensitive to tiny signal interruptions. If the sensor can’t consistently read the optical pulse waveform, the algorithm may “give up” and output a constant or minimal value.
Look for these fit problems:
- Sensor sits too loose (you can slide it a lot).
- Sensor is too tight, causing discomfort and inconsistent blood flow readings.
- Sensor placement changed by more than a couple of centimeters (especially between wrist and forearm positions).
- Hair, lotion, sunscreen, sweat buildup, or dry skin creates optical noise.
2) Placement drift after the sensor replacement
Even if the device is “on,” the effective position of the optical window matters. A strap replacement can rotate the sensor slightly. A new band can change how the device rests with your wrist angle. If the sensor ends up over a less favorable blood vessel area, HRV can flatline.
3) Motion artifacts during the first hours after switching sensors
During the first 1–24 hours after a sensor change, you often move more while you’re adjusting it. If the system starts estimating HRV before the signal stabilizes, it may lock into conservative values. Motion artifacts can be subtle—typing, cooking, or even brushing your teeth can affect wrist optical readings.
4) Algorithm calibration or firmware syncing lag
Many wearables use background calibration (baseline signal quality, sensor characteristics, and personal thresholds). After a replacement sensor or firmware update, the device may need time to re-learn your signal. If you check HRV immediately after pairing, it can appear flat or unusually consistent.
In practice, give it at least 24 hours of normal wear, and ideally one full night of sleep, before concluding the sensor is faulty.
5) Battery or charging behavior that interrupts data continuity
If your device had a low battery during the sensor change, it may have incomplete optical data windows. Some systems fill gaps with smoothing or fallback values—again, HRV can look “stuck.” If the sensor was removed during charging, HRV may not resume normally until the next stable session.
6) Environmental factors: temperature, vasoconstriction, and sweat
Cold hands and vasoconstriction can reduce the optical signal amplitude. If your first day after the fit change coincided with colder weather or a cooler room, HRV can degrade. Conversely, heavy sweat without proper cleaning can also interfere with readings.
Step-by-step troubleshooting to restore HRV variability

Use this sequence in order. It’s designed to quickly separate “fit/contact/signal” problems from “device/firmware” problems. Don’t skip the early steps—HRV flatlines are usually fixable without service.
Step 1: Confirm the reading isn’t just a display or sync issue
- Open the wearable app and check whether heart rate and other metrics (like resting heart rate or sleep stages) are updating normally.
- Look for data timestamp continuity. If the day shows gaps (for example, HRV only updates at the end of the day), the device may not be recording valid optical windows.
- Force a sync once while the device is on-body and you’re still.
If heart rate updates but HRV doesn’t, proceed to fit and signal quality checks.
Step 2: Refit with a repeatable placement method
This is the highest-yield fix. You want the sensor to sit consistently over the same area with stable contact pressure.
- Remove the sensor and clean the skin and sensor window. Use a gentle wipe (no residue). If you used lotion/sunscreen, wash and dry thoroughly.
- Re-wear it on a clean, dry area.
- Position the sensor where it previously worked best (often slightly above the wrist bone on the inside of the wrist/forearm). Keep it consistent with your usual successful placement.
- Adjust so it’s snug enough that you can’t easily rotate the sensor by hand, but you can still breathe comfortably and you don’t feel pinching.
- Do a quick test: gently flex your wrist. The sensor should remain firmly seated without sliding.
Practical example: if you replaced a strap and now the sensor sits closer to your palm than before, move it back by about 1–2 cm. That small shift can be enough to recover HRV variability.
Step 3: Do a 10-minute “signal settling” session
After refitting, don’t judge HRV instantly. Give the system time to stabilize.
- Sit still for 10 minutes.
- Keep your arm supported (rest it on a table or your lap) to reduce micro-movement.
- Avoid checking your phone constantly; movement can affect optical readings.
What you’re looking for: the app’s signal indicator (if available) should move toward stable readings. HRV may still be limited during the first few minutes. If after 10 minutes HRV remains flat while heart rate is fluctuating, continue.
Step 4: Check for motion artifacts with a controlled activity test
Some HRV flatlines happen because the algorithm is being overwhelmed by motion. You can test this quickly.
- Repeat Step 3 (10 minutes still).
- Then do 2–3 minutes of gentle movement (walking around the room at a normal pace).
- Observe whether HRV remains flat in both still and lightly active periods.
If HRV is flat in both scenarios, it’s likely fit/contact, sensor alignment, or calibration. If HRV only flatlines while moving, you may need to adjust how/when you expect HRV to be accurate (many wearables are less reliable during motion).
Step 5: Inspect the sensor window and strap condition
New sensors are sometimes slightly different in surface finish or alignment. Also, strap replacement can leave residue or misfit.
- Look for protective film on the sensor window. If present, remove it carefully.
- Check for scratches or smudges on the optical window. Even a thin film can change readings.
- Confirm the strap is routed correctly through any retention points. A strap threaded incorrectly can tilt the sensor.
If you recently installed a “troubleshooting sensor” or replacement module, treat this step as non-negotiable.
Step 6: Let it run through one full sleep cycle (or 24 hours of stable wear)
HRV data quality often improves after the wearable has enough consistent optical windows. For many devices, 24 hours is a reasonable minimum for recalibration after a sensor change, and a full night is better.
- Wear it continuously if possible (including during sleep).
- Keep placement consistent night-to-night.
- Don’t repeatedly remove and refit during the first day unless necessary for cleaning.
If HRV remains a flat line after 24 hours and one night, move to advanced fixes.
Simplest fixes first: what to try before you reset anything
Use these in order. Each one targets a common failure mode without risking data loss or deeper configuration changes.
1) Clean and dry both skin and sensor window
Optical sensors hate residue. If you sweat or apply lotion, clean before each troubleshooting attempt. A quick wipe and full dry can restore optical clarity.
2) Adjust strap tightness by small increments
Do not make big jumps. Try tightening or loosening by about 1–2 notches (or a small fraction of the strap’s adjustment range). Then wait 10 minutes and check whether HRV begins to vary.
3) Change the wrist/arm used (if your device allows)
If you usually wear on the left wrist, try the right for a day. Some people have better blood flow or less hair on one side. A placement shift of even a few millimeters can matter.
4) Keep your arm supported during early sessions
When you’re first testing after refit, rest your forearm. HRV is more likely to stabilize when the wrist isn’t moving.
5) Warm up if you’re cold
Cold reduces signal quality. If your hands are cold, warm them for a few minutes before you start a still test. Even a room-temperature change can help.
More advanced fixes when the HRV flatline persists
If you’ve done the basics—cleaning, refitting, still test, and at least 24 hours—then the issue may be calibration, settings, or a hardware-level fit mismatch. Try these next.
1) Re-pair or re-sync the device after confirming it’s the correct sensor module
If you replaced a sensor module or used a new strap with a different pairing ID, ensure the app is connected to the correct wearable hardware. In the app:
- Verify the device name/model matches the new sensor you installed.
- Check whether the app shows the correct serial or hardware identifier.
- Perform a full sync while the device is on-body.
If the app is paired to the wrong hardware (rare, but possible after swaps), HRV can behave oddly.
2) Update firmware and then wait for stabilization
If your wearable supports firmware updates, install them. HRV processing algorithms sometimes improve with updates. After updating:
- Wear the device normally for another 12–24 hours.
- Avoid frequent removal during that window.
Don’t judge results immediately after the update. Processing changes can temporarily affect how HRV is displayed.
3) Perform a “soft reset” (restart) rather than a full factory reset
Many devices allow a restart that clears temporary sensor processing states without wiping your account. Use the device’s instructions to restart the wearable and then:
- Refit it carefully using your best placement.
- Do the 10-minute settling session.
- Check whether HRV starts varying gradually.
If HRV begins to move again, you’ve likely resolved a temporary processing glitch.
4) Review wear settings that affect HRV capture windows
Some wearables have settings like “HRV measurement,” “sleep tracking,” “advanced sleep,” or “continuous monitoring.” After a sensor replacement, settings can revert or change during setup.
Check:
- That HRV/advanced recovery metrics are enabled.
- That sleep tracking is enabled if you rely on overnight HRV.
- That the correct user profile is selected (age/sex/weight can influence algorithm baselines).
5) Remove and re-seat the sensor module (if it’s user-serviceable)
If your wearable uses a detachable module (common on some bands), you may need to re-seat it correctly. A slightly misaligned module can change optical geometry.
- Remove the module.
- Check for debris in the connector area.
- Re-seat firmly according to the manufacturer’s alignment marks.
- Reattach the strap and repeat Step 2 (refit) and Step 3 (10-minute settling).
Use care here. If the module doesn’t click or seat consistently, stop and consider professional support.
6) Test HRV reliability with a second day and a consistent routine
HRV is sensitive to routine. If you changed sleep schedule, caffeine timing, hydration, or alcohol use in the same window you changed sensors, the variability pattern might look abnormal. Still, a true flatline is more often signal quality than lifestyle.
Try:
- Keep bedtime within 30–60 minutes of your usual time for two nights.
- Avoid heavy exercise immediately before sleep during the test period.
- Keep the device placement identical.
If the second day still shows HRV pinned to a narrow band, treat it as a measurement issue.
When replacement or professional help is the right move
You don’t want to keep chasing a hardware issue with repeated refits. Here are clear decision points.
Consider replacement if:
- After 24–48 hours of consistent wear (including one sleep cycle) HRV remains flat while heart rate varies.
- You see persistent low optical quality indicators (if your app provides a “signal” or “quality” metric) and refitting doesn’t change it.
- The sensor window is visibly damaged, scratched, or has a defect you can’t clean away.
- You’ve tried both wrists (where compatible) and HRV still flatlines.
- The device repeatedly flatlines only after the new sensor module install, suggesting a module defect or mismatch.
Get professional help if:
- The wearable is under warranty and you suspect a manufacturing defect. It’s often faster to initiate a warranty claim than keep troubleshooting.
- You’re seeing additional irregularities—like persistent missing data, repeated pairing drops, or sudden battery drain—after the sensor change.
- You’re unsure about opening the device, reseating internal components, or replacing a sensor module that isn’t explicitly user-serviceable.
Also consider medical guidance if your HRV issue is accompanied by symptoms
This guide focuses on measurement troubleshooting. If you have symptoms like chest pain, fainting, severe shortness of breath, or sustained abnormal heart rhythms, don’t rely on wearable HRV. Seek medical advice promptly.
Helpful product-related tips for common wearable setups (soft recommendations)
If you’re using a wearable with a detachable strap or sensor module, you may find that accessories and fit tools make troubleshooting easier. The goal is stable contact, not “tighter at all costs.”
- Quality cleaning wipes: A residue-free wipe can make a measurable difference in optical clarity. Keep a small pack in your gym bag for the first 1–2 days after a sensor replacement.
- Adjustable straps: If your replacement strap doesn’t have the same adjustment range as your original, you may struggle to hit the optimal snugness. A strap that holds position without sliding can restore HRV variability faster.
- Skin prep: If you commonly use lotion, consider switching to a minimal, quick-dry moisturizer on the measurement area—or avoid it entirely before overnight wear during troubleshooting.
These are gentle recommendations, not mandatory purchases. Most HRV flatline fixes come from cleaning, correct placement, and giving the device enough time to recalibrate.
Quick decision flow you can follow tonight
If you want a practical checklist for the next 30–60 minutes, do this:
- Clean skin and sensor window.
- Refit snugly and consistently (aim for no sliding when you gently flex your wrist).
- Sit still 10 minutes with your arm supported.
- Check whether HRV begins to show variation rather than staying pinned.
- If still flat, avoid repeated refits. Wear it normally and plan to evaluate after one full night.
That approach prevents the most common trap: constantly adjusting the sensor while the wearable is trying to establish a stable baseline.
Why HRV is the first metric to “break” after a fit change
Heart rate can remain usable even when the optical signal is imperfect. HRV, on the other hand, depends on accurate detection of beat-to-beat timing. That’s why HRV flatlines often appear right after you change straps, move placement, or start using a new sensor module—even if your wearable still shows a plausible heart rate.
In many cases, once the sensor contact stabilizes and the device has enough time to recalibrate, HRV returns to a normal pattern within 1–2 days. If it doesn’t, the sensor module may have a defect, or the fit system may not be compatible with your anatomy and placement.
How to tell normal recalibration from a persistent sensor problem
Here’s a practical way to interpret what you see:
- Normal recalibration: HRV may look flat for part of the first day, then begins to vary gradually after a stable night. Other metrics remain consistent.
- Persistent sensor problem: HRV stays flat across both still time and sleep across multiple days. Refitting doesn’t change it, and the signal quality indicator (if present) stays low.
When it’s persistent, you’ll save time by moving toward replacement or warranty support rather than continuing the same refit loop.
What to document so troubleshooting is faster next time
If you end up contacting support or doing a warranty claim, a short log can speed things up. Write down:
- The date/time you installed the new sensor module or replacement strap.
- Exact placement (left/right wrist, approximate position relative to the wrist bone).
- How snug it was (for example, “snug, cannot rotate by hand” vs “loose, slides easily”).
- Whether you cleaned the sensor window before wearing.
- Whether HRV flatlined while you were still for 10 minutes.
This turns your experience into actionable evidence instead of guesswork.
10.03.2026. 18:14